In this first Android Tutorial, we are going to create a new android studio app while learning Android App developments in Android Studio. Let’s make an android app that shows the toast when Button Click on in Android App.
How to create an Android App using Android Studio?
First, you need to set up the basic requirements which are required to develop an android application
Install Android Studio IDE
Android Studio is the official software of Google or IDE (Integrated Development Environment) to develop an Android app. Android Studio provides the right environment for Android app development and coding. There are currently two languages for the development of native Android applications
- Java
- Kotlin
However, most of the applications available in the Play Store are only developed in Java, since Kotlin is the latest language introduced by Google for Android development.
Before jumping to the Android Studio download, meet the requirements first.
Operating system requirements:
Pre-Requisite
- The Java Development Kit (JDK)
If you have the latest JDK installed on your system, you do not require to install it again. The Java Development Kit(JDK) consists of tools like the Java compiler, used by the Software development kit (SDK), and an integrated development environment (IDE) to develop Java programs. The JDK also includes a Java Runtime Environment (JRE) that allows Java programs, such as Eclipse, to run on the system.
Download the JDK Click Here
Download the Android Studio Click Here
Create a New Android Project
Open the android studio for the application list for the first time and let’s create a new Android app. Now, You will see a new screen with several options, From that options menu in android studio, you should select Start a new Android Studio project to create a new application.

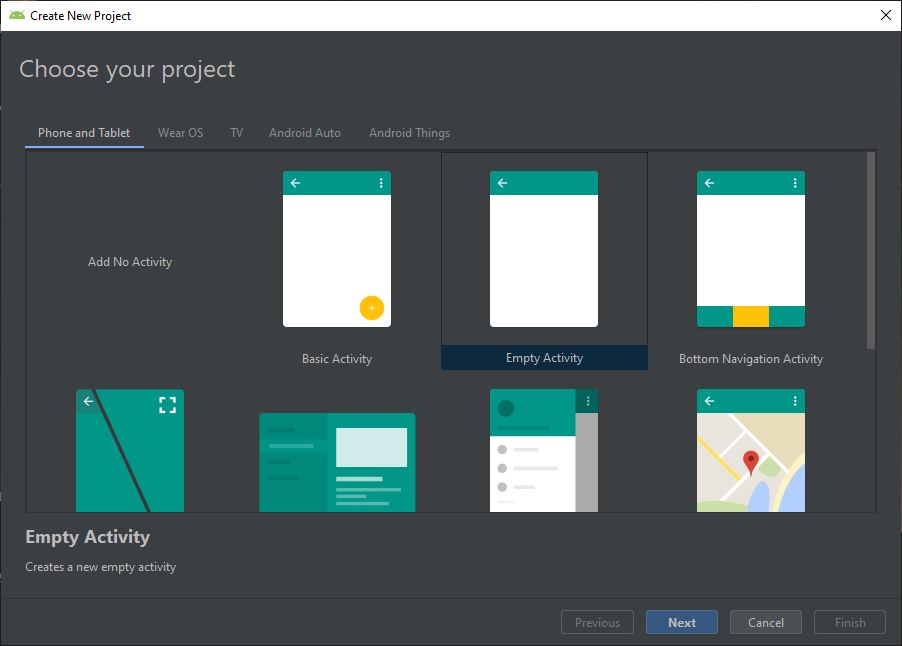
Choose Your Project
When you create a new android studio project, a new screen appears where you can select from multiple activities. In here each template provides a different kind of android project with UI and basic code structure. These are preprogrammed basic templates. Therefore, for this project, we are going to select an empty activity. This is because you can do what you want later.
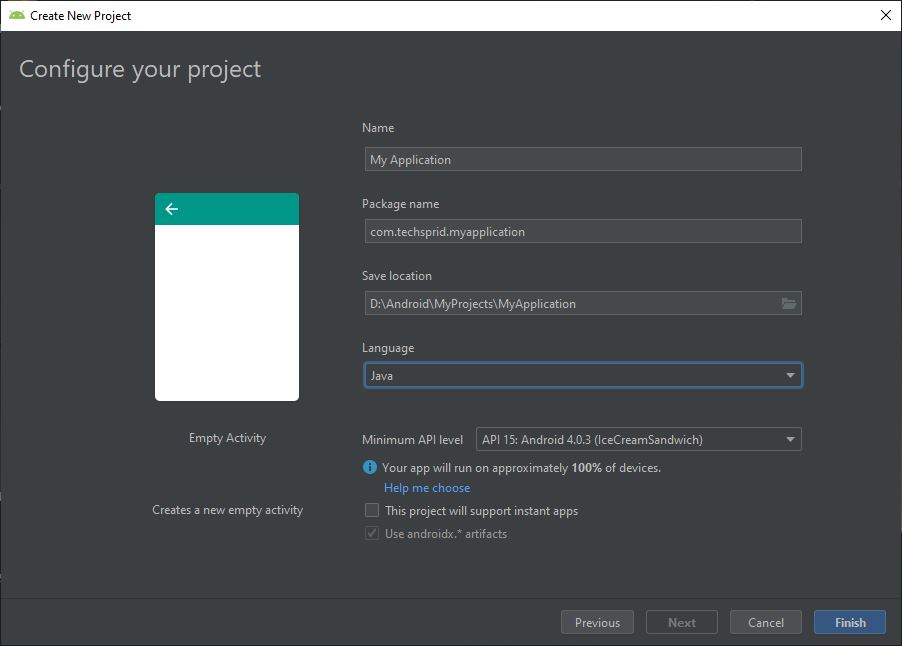
Configure Project Details
This is an Android app basic configuration screen. Here you need to enter the project name, package name and select a Java or Kotlin language. From the Android versions below, you must select the minimum version to support almost all type of devices.
Name: Your project Name
Package Name: most of the developer use their website in reverse order and put app name in the last as an example let’s take the website as techsprid.com then package name will be com.techspird.myapplication
Design User Interface
All user interfaces located in app > res> layout folder. Open the activity_main.xml file to design our project user interfaces. To design a project, simply place two TextView and a button. You can copy the code from the .xml file as follows.
<?xml version="1.0" encoding="utf-8"?>
<androidx.constraintlayout.widget.ConstraintLayout xmlns:android="http://schemas.android.com/apk/res/android"
xmlns:app="http://schemas.android.com/apk/res-auto"
xmlns:tools="http://schemas.android.com/tools"
android:layout_width="match_parent"
android:layout_height="match_parent"
tools:context=".MainActivity">
<TextView
android:id="@+id/textView"
android:layout_width="wrap_content"
android:layout_height="wrap_content"
android:textSize="30dp"
android:textColor="#000"
android:fontFamily="cursive"
android:textStyle="bold"
android:text="My First Android Application"
app:layout_constraintBottom_toBottomOf="parent"
app:layout_constraintLeft_toLeftOf="parent"
app:layout_constraintRight_toRightOf="parent"
app:layout_constraintTop_toTopOf="parent"
app:layout_constraintVertical_bias="0.161" />
<Button
android:id="@+id/btnClickMe"
android:layout_width="wrap_content"
android:layout_height="wrap_content"
android:layout_marginStart="8dp"
android:layout_marginLeft="8dp"
android:layout_marginTop="8dp"
android:layout_marginEnd="8dp"
android:layout_marginRight="8dp"
android:layout_marginBottom="8dp"
android:text="Click Me"
app:layout_constraintBottom_toBottomOf="parent"
app:layout_constraintEnd_toEndOf="parent"
app:layout_constraintHorizontal_bias="0.498"
app:layout_constraintStart_toStartOf="parent"
app:layout_constraintTop_toBottomOf="@+id/textView"
app:layout_constraintVertical_bias="0.373" />
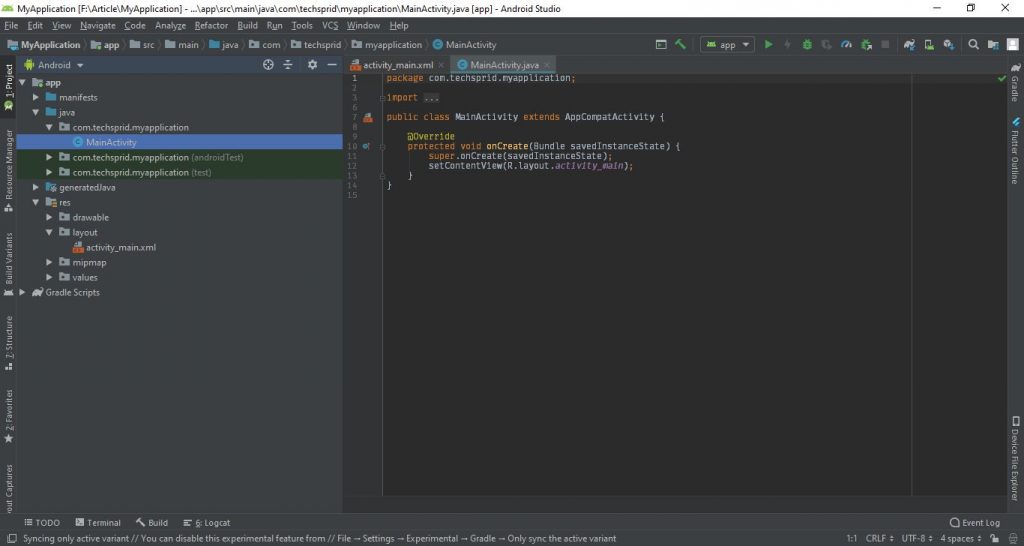
</androidx.constraintlayout.widget.ConstraintLayout>Bind Interface to Java
To start the java coding, you need the MainActivity.java file that is created automatically. Therefore, you must first bind the Button to a Java file.
public class MainActivity extends AppCompatActivity {

 @Override
 protected void onCreate(Bundle savedInstanceState) {
     super.onCreate(savedInstanceState);
     setContentView(R.layout.activity_main);

     //initialize the button
     Button btnClickMe = findViewById(R.id.btnClickMe);

     //set onclick listener
     btnClickMe.setOnClickListener(new View.OnClickListener() {
         @Override
         public void onClick(View view) {
             //set display toast message
             Toast.makeText(MainActivity.this, "Button Clicked", Toast.LENGTH_SHORT).show();
         }
     });
 }
}
Android App Handle Click Listener Method
Display the toast message with the button click function. We need to create a simple onClick (), listener.
//set onclick listener
 btnClickMe.setOnClickListener(new View.OnClickListener() {
     @Override
     public void onClick(View view) {
         //set display toast message
         Toast.makeText(MainActivity.this, "Button Clicked", Toast.LENGTH_SHORT).show();
     }
 });
Run Your Android App
Click the run button to run your application on the emulator or your android device. When application launch in the device, clicks the button. you can see the toast message when you click the button.
Happy Coding…!